Garage Sports Organization: How to Organize Sports Equipment Like a Pro (15 Actionable Steps)
Picture this: it’s Saturday morning, game day, and you’re already running five minutes late. You reach into the garage for your kid’s helmet and instead trigger a full-blown avalanche — hockey sticks crash to the floor, a basketball rolls under the car, and somewhere in the pile of shin guards and lacrosse bags, one cleat is missing. Again.
If that sounds familiar, you’re not alone. Garage sports organization is one of the most searched and most neglected areas of home organization. The average American household with two or more kids playing sports accumulates over 200 pounds of sports gear by the time those kids reach high school. That gear doesn’t organize itself, and most garages weren’t designed to hold it.
The two core problems are clutter and odor. Clutter creates chaos — lost gear, damaged equipment, and wasted money repurchasing things you already own. Odor comes from wet pads, damp cleats, and helmets crammed into sealed bins where bacteria thrive.
The good news: there is a proven solution. A zoned vertical system turns even a small, cluttered garage into a functional sports hub. It works for one-car garages, two-car garages, and everything in between. All it takes is the right plan and the right tools.
This article gives you both. You’ll learn the 5-Zone System, a step-by-step guide to organize sports equipment from scratch, a no-drill option for renters, and specific product recommendations based on customer reviews and expert research — not personal testing.
Let’s get your garage under control.
Why Most People Fail at Garage Sports Organization
Most garages fail not because of a lack of space, but because of a lack of strategy. Three mistakes account for nearly every disorganized sports garage.
Mistake 1: Everything Goes on the Floor
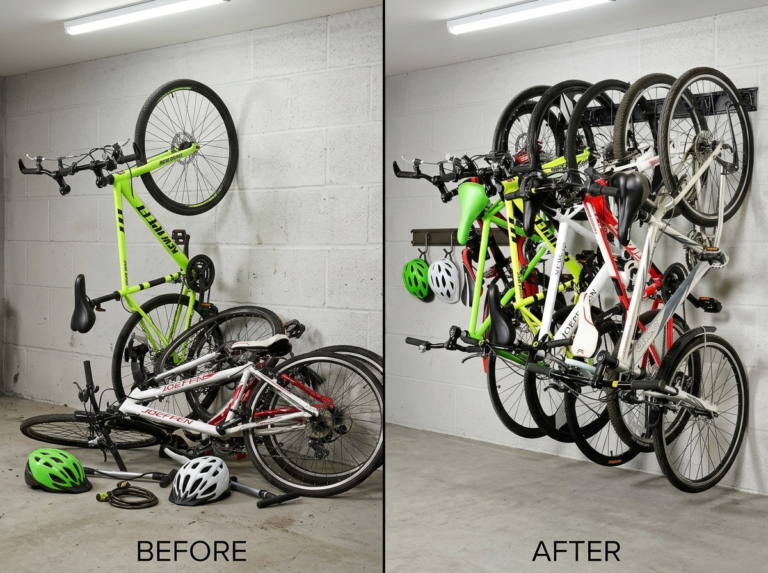
The floor is a dumping ground, not a storage solution. Gear piled on the floor gets kicked, crushed, forgotten, and eventually ruined. A baseball bat left on a cold concrete floor can warp. A foam pad left flat will compress permanently. Vertical wall storage changes the game entirely.
Mistake 2: Using Sealed Bins for Wet or Sweaty Gear
This is one of the most damaging mistakes in garage sports organization. When a hockey pad, a pair of cleats, or a goalie glove goes into a sealed plastic bin while still damp, it creates the ideal environment for mold and bacterial growth. Within 24 hours, that bin becomes a biohazard. Never store wet gear in sealed containers. Airflow is non-negotiable.
Mistake 3: Buying Generic Hardware That Doesn’t Fit
Standard garage hooks are designed for garden tools — straight handles, uniform shapes. Sports equipment is anything but uniform. A lacrosse stick has a head. A hockey stick has a blade. A baseball glove has an awkward curve. Generic hooks drop gear constantly, which leads to damage and frustration. Sport-specific hooks and racks hold equipment the way it was designed to be held.
The Cost of Failure
Disorganization is expensive. Families routinely spend $50–$200 per year repurchasing sports items they already own but cannot locate. Broken bats, cracked helmets from being dropped repeatedly, and mildewed pads that must be replaced — these costs add up fast. Investing $100–$300 in a proper garage sports organization system pays for itself within a single season.
The 5-Zone System for Garage Sports Organization
The foundation of every successful sports garage is a zoned layout. Rather than organizing by sport, the 5-Zone System organizes by frequency of use, user height, and moisture level. This makes the system intuitive — anyone in the family can use it without thinking.
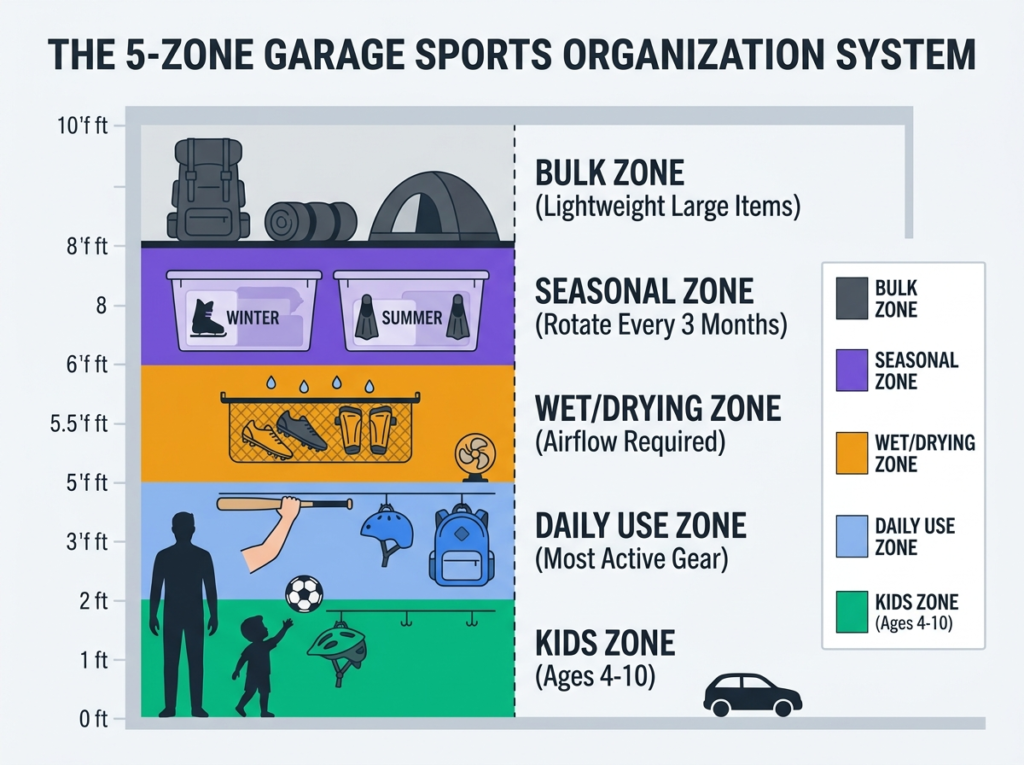
Zone 1: The Daily Use Zone (Waist to Eye Level)
This is the most valuable real estate in the garage. Anything used three or more times per week belongs here — helmets, frequently used balls, practice jerseys, cleats worn to every game, and the gear bag that goes to every session.
Mount hooks, slatwall panels, or pegboard in this zone and hang items at a height that any adult can access without reaching up or bending down. This is the zone that gets used every single day, so it needs to be the most accessible, the most clearly labeled, and the most regularly maintained.
Many homeowners find that dedicating a single 4-foot section of wall to this zone and keeping it strictly limited to current-season daily gear prevents the slow creep of clutter that collapses most systems.
Zone 2: The Kids Zone (Floor to 3 Feet)
Children cannot organize what they cannot reach. This is a fundamental principle that most garage organization guides ignore entirely. If your child’s soccer ball is on a high shelf, they will not put it back there — they’ll drop it on the floor. If their helmet hook is at adult eye level, they’ll leave the helmet in the car.
The Kids Zone dedicates the lowest three feet of wall space to gear belonging to children. Lower hooks, open bins at floor level, and color-coded containers make it easy for kids to participate in the system. Many families report that once kids can reach their own storage, they actually start putting things away.
Pro tip: Assign each child a color and label every hook, bin, and shelf in that color. Takes five minutes to set up and eliminates the “that’s MY glove” argument.
Zone 3: The Wet/Drying Zone (Near Side Door or Utility Sink)
Wet gear needs its own dedicated space with maximum airflow. This zone belongs near the side door of the garage, a utility sink, or any area where ventilation is strongest.
The Wet/Drying Zone uses open mesh racks, ventilated wire shelving, and boot dryers rather than bins or closed shelves. Cleats come off at the door and go directly here. Shin guards, pads, and gloves hang on open hooks to air out before being returned to their primary storage spot.
This zone should never be enclosed. A curtain, a cabinet door, or a closed bin defeats the entire purpose. Airflow is what prevents odor and mold. Many families add a small box fan near this zone to accelerate drying, particularly in humid climates.
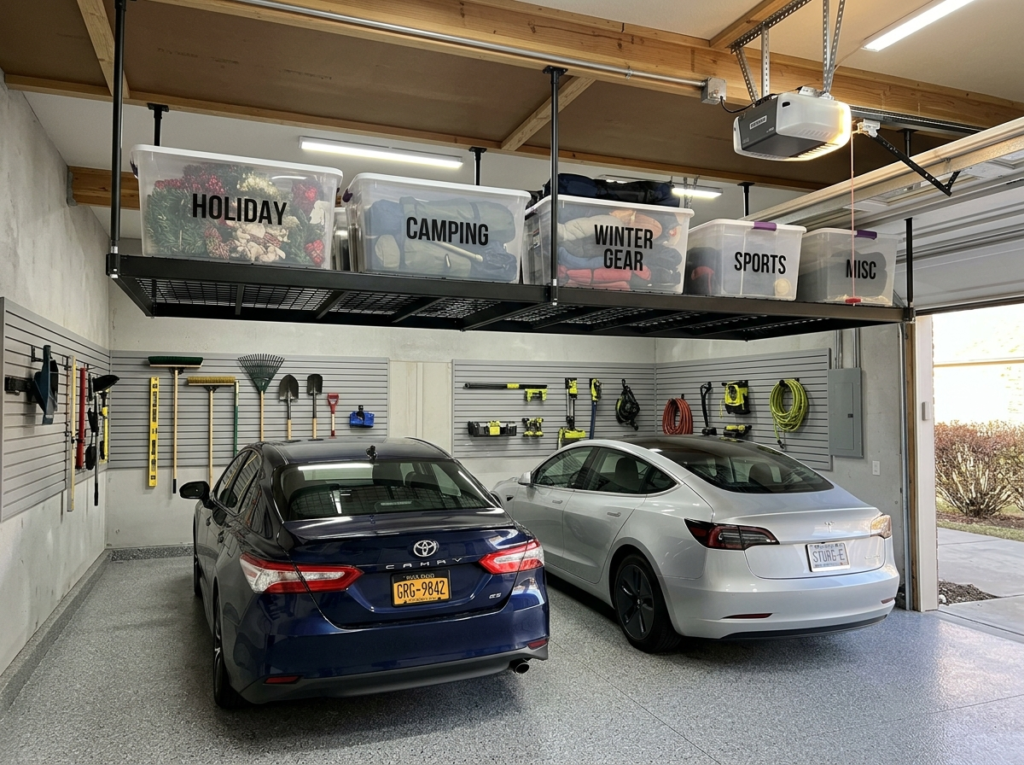
Zone 4: The Seasonal Rotation Zone (High Shelves or Ceiling Rack)
Ski equipment in August. Swim fins in December. These items don’t need to be accessible — they need to be out of the way. The Seasonal Rotation Zone uses overhead ceiling racks or high wall shelves for gear that rotates in and out on a quarterly or semi-annual basis.
[AMAZON LINK PLACEHOLDER: Overhead Ceiling Storage Rack 4×8 ft 250 lb Capacity]
A 4×8 ceiling rack holds an enormous amount of bulky seasonal gear — skis, snowboards, camping chairs, inflatable pool toys — without consuming a single square foot of floor space. This is one of the highest-return investments in garage sports organization because it effectively adds a second level of storage to any garage.
Pro tip: Swap this zone twice a year — once in fall and once in spring. Block 30 minutes on the calendar for each swap, and the whole system stays current.
Zone 5: The Bulk/Camping Zone (Back Wall, Deep Storage)
The back wall of the garage is for large, infrequently accessed items. Coolers, tents, canoes, camp chairs, duffle bags, and large gear bags belong here on heavy-duty freestanding shelves or wall-mounted bracket systems.
This zone benefits from deep shelving — 18 to 24 inches — because the items stored here are large. Clear bins with lids work well here because items in this zone are rarely wet when stored, and the lids keep out dust and pests.
Label every bin in this zone clearly. When you’re looking for the lantern at 6am before a camping trip, you don’t want to open six bins to find it.
Step-by-Step: How to Organize Sports Equipment in Any Garage

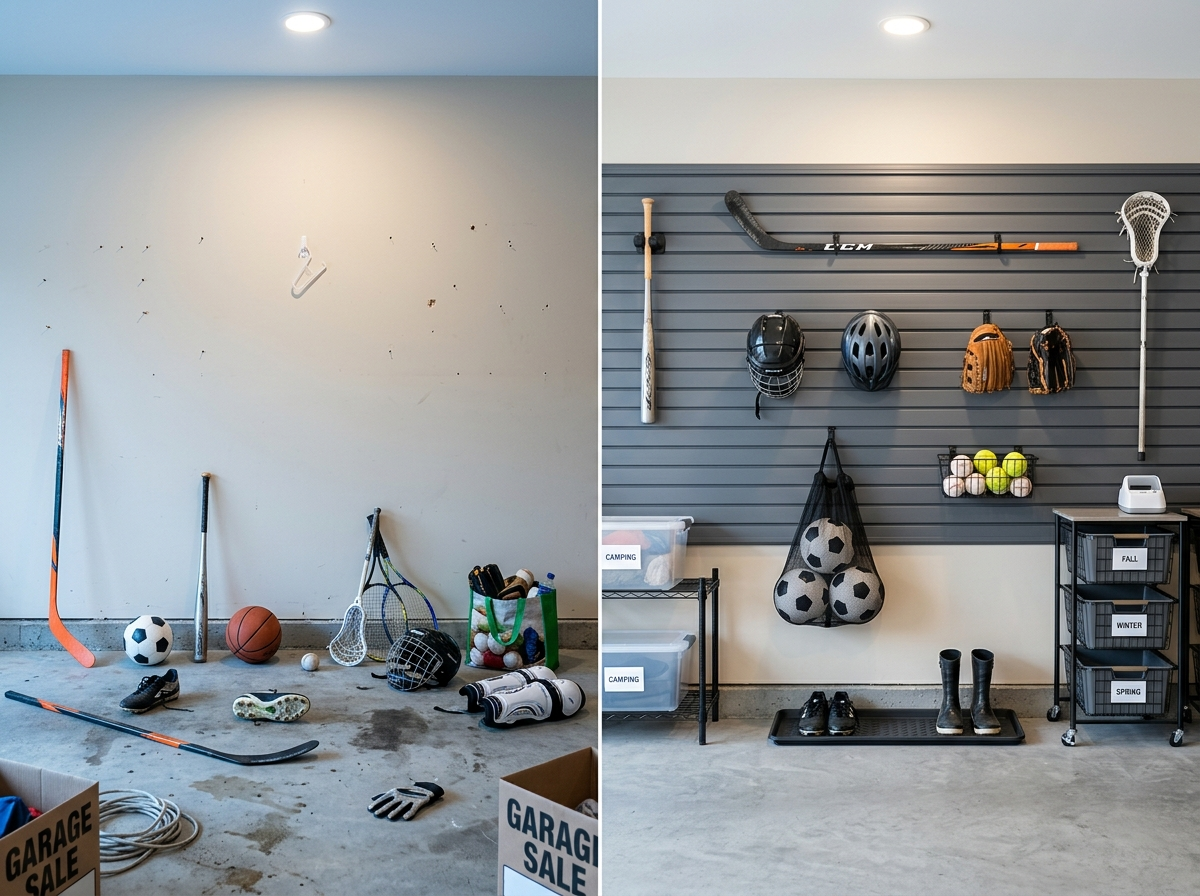
Step 1: Empty Everything Onto the Driveway
This step feels extreme. Do it anyway.
You cannot organize a space you can’t fully see. Pull every piece of sports gear out of the garage and onto the driveway. Every ball, every helmet, every orphaned cleat, every foam roller, every bike pump, every deflated basketball that’s been in the corner since 2019. Get it all out.
This is not just a practical step — it’s a psychological one. Seeing everything laid out forces a realistic assessment of what you actually own. Most families are genuinely shocked by the volume of gear they uncover. The driveway audit is where the real organizing begins.
Pro tip: Do this on a dry day with several hours of daylight. You’ll need both.
Step 2: The 4-Pile Sorting Method
Before anything goes back into the garage, every item gets sorted into one of four piles: Keep, Store, Donate, or Trash.
Keep: gear that is currently in use, in good condition, and belongs to an active player in the household.
Store: gear for sports that are out of season but will be used again. This goes into the Seasonal Rotation Zone.
Donate: gear that no longer fits, belongs to a sport no one plays anymore, or duplicates something you already have. Youth sports leagues, schools, and community centers are always accepting equipment donations.
Trash: anything broken, mildewed, cracked, or unsafe. A cracked helmet is not a helmet — it’s a liability. Throw it out.
Be ruthless in this step. Every item that goes back into the garage should earn its space. If you’re not sure, donate it.
Step 3: Deep Clean the Floor and Walls
With the garage empty, this is the best opportunity to address grime, oil stains, and the accumulated residue of years of sports activity. A clean garage is not just aesthetically better — it’s structurally safer for the storage systems you’re about to install.
Sweep the floor completely, then apply a concrete degreaser to any oil or grease stains. For heavy buildup, a pressure washer makes the job dramatically faster. Allow the floor to dry completely before installing any shelving or adhesive products.
Wipe down the walls as well. If you’re planning to install slatwall panels or pegboard, the walls need to be clean and dry for proper adhesion and anchoring. This step is skipped by most people and regretted by most people.
Step 4: Install a Slatwall or Heavy-Duty Pegboard System
This is the structural backbone of garage sports organization. A slatwall panel system or metal pegboard kit transforms a bare wall into a fully configurable storage system. Unlike fixed hooks screwed directly into drywall, slatwall and pegboard systems allow you to move hooks, bins, and shelves anywhere on the panel without patching holes.
[AMAZON LINK PLACEHOLDER: Wall Control Metal Pegboard Kit]
For sports equipment specifically, metal pegboard outperforms plastic versions in both weight capacity and durability. Many homeowners find that a 4×8 foot section of metal pegboard holds everything from baseball bats and lacrosse sticks to helmets and gear bags without sagging or warping.
Install panels at stud locations for maximum holding strength. Most slatwall and pegboard systems include installation hardware, but investing in a stud finder before installation saves significant frustration.
Pro tip: Install the bottom of your first panel at exactly 18 inches from the floor. This preserves floor-level space for bins and freestanding racks while keeping the main panel in the Daily Use Zone height range.
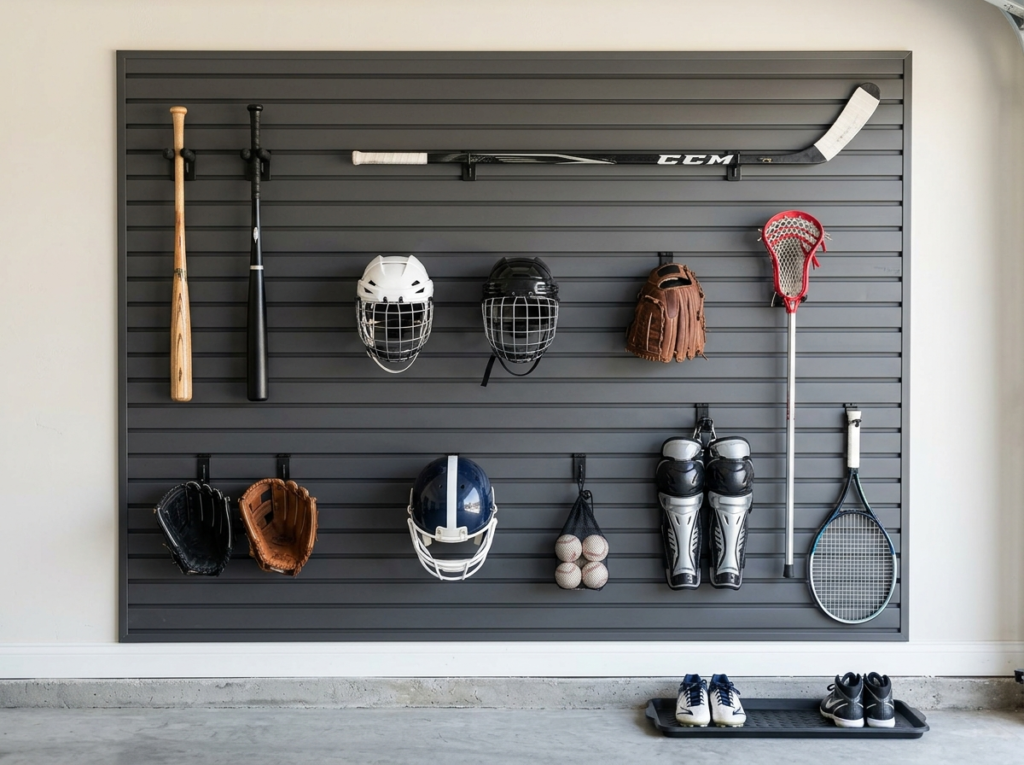
Step 5: Hang Helmets and Bats Using Sport-Specific Hooks
Generic hooks drop helmets. Sport-specific hooks hold them securely.
Helmet hooks are designed with a wider, curved profile that cradles the helmet’s interior without scratching it. Bat hooks typically feature a horizontal cradle that holds the bat horizontally to prevent warping — particularly important for wood bats, which can develop a curve if stored vertically under their own weight.
[AMAZON LINK PLACEHOLDER: 12-Pack Heavy Duty Sports Hooks for Bats and Sticks]
For lacrosse sticks and hockey sticks, look for J-hooks or double-arm hooks that hold the shaft of the stick while also supporting the head or blade. A stick leaning against a wall will eventually fall. A stick on the right hook stays put indefinitely.
Many families organize this section by sport or by player, with clearly labeled zones for each. Color-coded tape on hooks is a fast, low-cost way to assign ownership without purchasing additional labels.
Step 6: Create a Ball Corral Using Bungee Cords or Mesh Baskets
Balls are the biggest offenders in garage floor clutter. They roll, they bounce, they find their way under cars and behind shelving units. The solution is a dedicated ball corral that contains them without crushing them.
Two approaches work well. The first is a bungee cord ball corral — a corner-mounted system using heavy-duty bungee cords stretched between two walls or wall-mounted hooks, creating a hammock-style pocket that holds multiple balls without a rigid structure.
[AMAZON LINK : Over-the-Door Clear Vinyl Shoe Organizer (24 pockets)]
The second approach is a wire mesh ball basket mounted to the wall at mid-height. These baskets hold 4–8 balls depending on size and allow airflow to reach each ball, which extends the life of materials like leather and rubber.
[AMAZON LINK : Heavy Duty Wire Ball Basket Wall Mount]
Pro tip: Store balls slightly deflated during the off-season. This extends bladder life and saves space.
Step 7: Build a Shoe and Cleat Drying Station
Cleats should never go into a sealed bin. The combination of sweat, grass, and enclosed plastic creates a bacterial ecosystem that destroys materials and produces odors that are nearly impossible to eliminate.
Instead, build a dedicated open drying station near the garage entry point. The simplest version uses a boot and cleat drying rack — a low-profile rack with ventilated slots that hold footwear in an open, elevated position so air circulates around and through them.
[AMAZON LINK : Boot and Cleat Drying Rack with Air Vents]
For households with multiple athletes, a boot dryer with individual nozzles significantly accelerates the drying process. These devices plug into a standard outlet and blow warm, low-heat air through the interior of each shoe over 1–2 hours. Customer reviews consistently cite these as game-changers for families dealing with chronic cleat odor.
Position this station as close to the garage entry door as possible. The goal is to make the transition from car to drying station automatic, not something that requires a detour across the garage.
Step 8: Add a Glove and Pad Rack
Gloves, shin guards, elbow pads, and hockey pads share one critical storage requirement: they must be stored open and with airflow. A baseball glove stored closed, compressed, or in a bin will lose its pocket shape over a single off-season. Hockey pads stored damp in a pile will develop mold within days.
A ventilated wire shelf works well for pads and guards because it allows air to circulate from below as well as above. Many homeowners find that a simple open wire shelf at waist height in the Wet/Drying Zone handles the bulk of pad storage for one or two athletes.
For gloves specifically, a glove stand — or even a simple hook through the finger opening — keeps the glove open, maintains the pocket, and allows interior drying. This is a small investment that dramatically extends the life of leather gloves.
Step 9: Label Everything with Weatherproof Labels
Labels turn a good garage storage system into a sustainable one. Without labels, systems drift. Gear goes back in the wrong spot, zones blur into each other, and within three months the system has reverted to the original chaos.
[AMAZON LINK : Weatherproof Label Maker with Industrial Tape]
Weatherproof labels are essential for garages because temperature swings, humidity, and occasional moisture cause standard paper labels to peel, smear, and fall off within weeks. A label maker with industrial laminated tape produces labels that adhere to plastic, metal, and wire shelving in any climate.
Label every bin, every hook zone, every shelf section, and every zone boundary. Be specific: not “balls” but “soccer balls” and “basketballs.” Not “gear” but “Jake’s hockey gear” and “Emma’s lacrosse gear.”
Pro tip: Add a brief label to the inside of each bin lid showing what belongs inside. This makes it easy for anyone helping to unload after a game to put things in the right place.
Step 10: Establish a 5-Minute Reset Routine
A garage organization system is only as good as the habits built around it. This is the step most people skip, and it’s the reason most systems collapse within 60 days.
The 5-minute reset is a non-negotiable end-of-game, end-of-practice, or end-of-weekend routine. Every piece of gear that came out of the garage gets put back before the garage door closes for the night. No exceptions.
Five minutes is genuinely enough time to reset a well-organized sports garage. When everything has a labeled place and that place is accessible, putting things away is fast. The labor is in the decision-making — and good labels eliminate the decisions.
Many families find it useful to make this a shared habit, with each athlete responsible for their own zone. A laminated “Reset Checklist” posted inside the garage door reinforces the routine until it becomes automatic.
Top Amazon Products to Organize Sports Equipment
Before diving into product details, here’s a quick reference table to help match problems to solutions:
| Problem | Solution Type | Best For |
|---|---|---|
| No wall organization | Slatwall or pegboard kit | Garages with bare drywall walls |
| Sticks and bats falling | Sport-specific hook pack | Baseball, hockey, lacrosse families |
| Balls rolling everywhere | Wire basket or bungee corral | Multi-sport households |
| Odor from pads/gloves | Ventilated wire shelf | Hockey, football, baseball players |
| Seasonal gear overflow | Rolling cart with locking wheels | Rotating gear between seasons |
1. Wall Organization System: Metal Pegboard Kit
A wall-mounted metal pegboard system is the foundation of any serious garage sports organization setup. This product is designed for heavy loads — many commercial-grade metal pegboard kits support 50–100 lbs per panel when properly anchored to studs.
What makes this solution effective is its modularity. Every hook, shelf, and bin attachment can be repositioned in seconds without any tools, which means the system adapts as your sport roster changes. A family that adds a new sport doesn’t need to reinstall the entire system — just rearrange the attachments.
According to customer reviews, the main benefit over plastic pegboard is rigidity: metal panels do not flex under load, so heavier items like batting helmets and hockey bags stay securely in place. Many homeowners find that a single 2×4 foot metal panel holds a complete baseball setup — bats, helmet, gloves, and cleats.
[AMAZON LINK : Wall Control Metal Pegboard Kit]
2. Sport-Specific Hook Pack
A frequently recommended option for multi-sport households is a multi-pack of sport-specific hooks designed to accommodate the irregular shapes of athletic equipment. Standard hook packs in this category typically include J-hooks, double-arm hooks, bat cradles, and stick holders in a single purchase.
This product is designed for wall-mounted systems like pegboard and slatwall, with standardized attachment points that fit both. Customer reviews indicate that the main benefit is the elimination of gear falling off generic hooks — sport-specific hooks have locking channels or wider profiles that match the geometry of each equipment type.
A 12-pack or 16-pack provides enough variety to cover multiple sports simultaneously, which makes it an efficient purchase for families managing gear for more than one athlete.
[AMAZON LINK : 12-Pack Heavy Duty Sports Hooks for Bats and Sticks]
3. Ball Storage Solution: Wire Ball Basket
This product solves the perennial problem of balls migrating across the garage floor. A heavy-duty wire ball basket mounts to the wall at a comfortable reach height and holds 4–6 balls depending on size, keeping them elevated, visible, and accessible.
What makes this solution effective is the open wire construction — it allows airflow to reach the surface of each ball, which is particularly important for leather soccer balls and rubber basketballs that can develop odors and degrade when stored in enclosed containers.
Customer reviews frequently highlight the ease of installation (most mount with four screws into studs) and the durability of the powder-coated steel frame, which resists rust and corrosion in humid garage environments. Many homeowners report that this single product eliminates the majority of floor clutter in a sports garage.
[AMAZON LINK : Heavy Duty Wire Ball Basket Wall Mount]
4. Helmet and Glove Shelf: Ventilated Wire Shelf
A ventilated wire shelf addresses one of the most damaging storage habits in sports households — storing pads and helmets in solid-bottom enclosed spaces. This product is designed with an open wire grid that allows airflow from all directions, which dramatically reduces drying time and prevents bacterial growth.
According to customer reviews, the main benefit is versatility: the same shelf that holds hockey helmets and shoulder pads during winter holds swim bags and baseball helmets during spring and summer. The open design means no gear is hidden, which makes it easier to do a quick visual check before leaving for a game.
Many homeowners find that a 24-inch wide ventilated shelf mounted in the Wet/Drying Zone handles the full pad set for one hockey player or the complete uniform and gear set for two baseball players simultaneously.
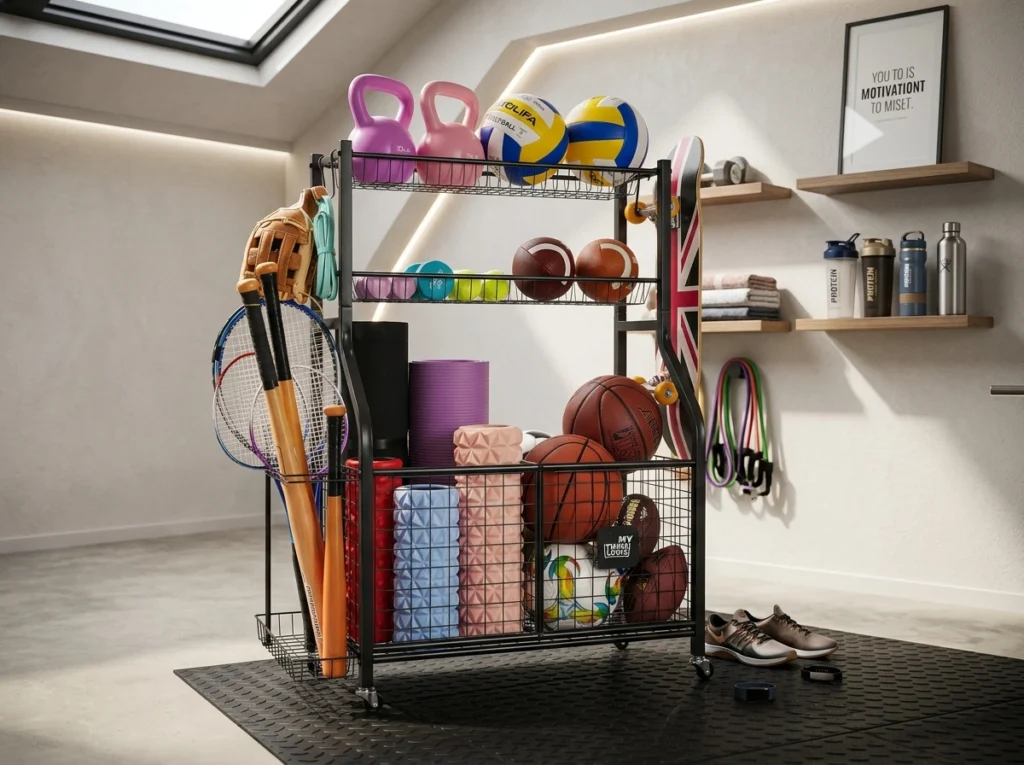
5. Rolling Cart for Seasonal Swaps
A 3-tier rolling utility cart with locking wheels is one of the most practical tools for managing seasonal transitions in a sports garage. This product is designed for both storage and mobility — gear can be organized on the cart during the active season and then rolled to the back wall when the season ends.
What makes this solution effective is the locking wheel mechanism, which prevents the cart from rolling when parked and allows easy repositioning when needed. Customer reviews indicate that the 300–400 lb weight capacity typical of commercial-grade utility carts makes them suitable for heavy hockey bags, camping gear, and multi-sport equipment.
A frequently recommended option for this purpose is a cart with solid shelves rather than wire for the bottom tier, providing a stable platform for heavy items, with wire or slatted upper tiers for better visibility of smaller gear.
[AMAZON LINK PLACEHOLDER: 3-Tier Rolling Utility Cart with Locking Wheels]
The “No-Drill” Rental-Friendly Guide to Garage Sports Organization
Renting a home or apartment with a garage doesn’t mean settling for chaos. A complete garage sports organization system is achievable without a single screw in the wall.
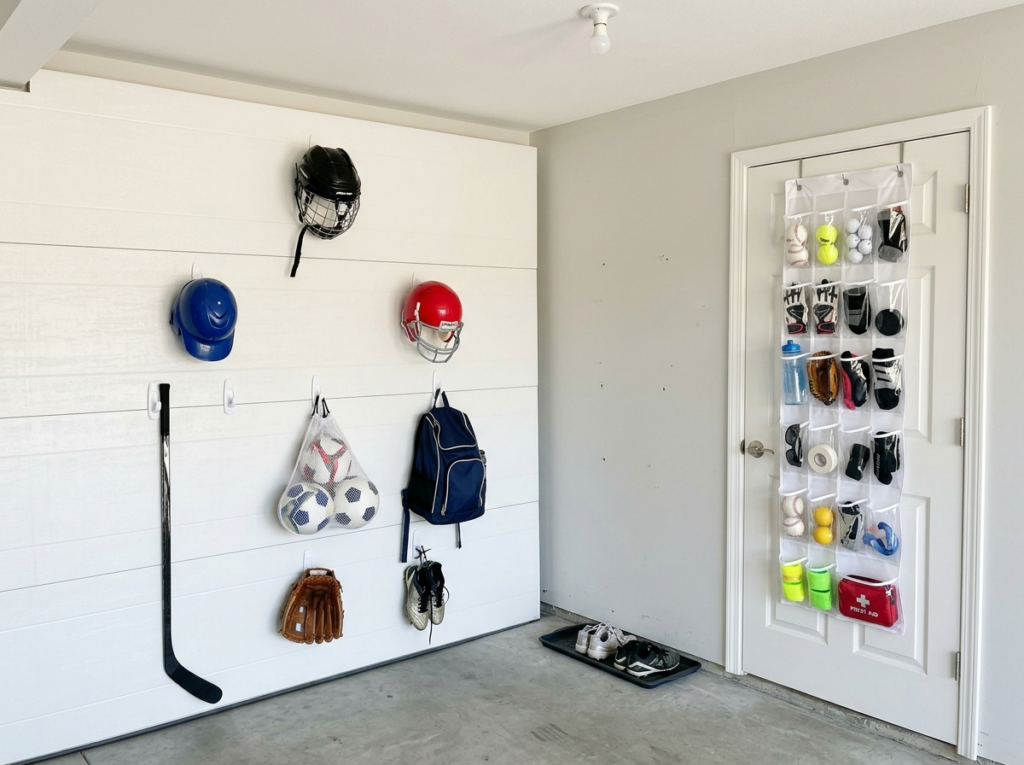
Command Hooks (5 lb+ Rating)
Heavy-duty Command hooks rated for 5 lbs or more hold surprisingly well on smooth garage walls and doors. These work best for lightweight items — swim bags, single helmets, light gear bags, and gloves. Cluster several together to create a functional hanging station. Many renters use a combination of 3M Command Large hooks and strips to create an entire helmet-and-bag wall without any hardware.
Freestanding PVC Pipe Rack for Balls
A freestanding PVC pipe rack can be built in under an hour with materials from any hardware store, or purchased pre-made. This structure requires no wall attachment and can be repositioned or disassembled at any time. It holds bats, hockey sticks, lacrosse sticks, and can be modified with horizontal rungs to serve as a ball corral.
Over-the-Door Clear Vinyl Organizers
An over-the-door 24-pocket vinyl organizer hangs on any standard door without screws or adhesive. For sports gear, this solution works exceptionally well for small items — batting gloves, mouth guards, grip tape, wristbands, and sports goggles. Many renters find that two organizers — one on the interior garage door and one on the back of the side door — hold the equivalent of a full pegboard worth of small gear.
Tension Rod Systems
Industrial tension rods rated for 50+ lbs can be installed horizontally between any two parallel walls or within a shelving alcove, creating a bar from which bags, helmets, and gear bags can be hung on S-hooks. No drilling, no adhesive, completely removable.
Freestanding Wire Shelving Units
A 5-tier freestanding wire shelving unit requires no wall attachment and provides substantial storage capacity. Many models hold 800–1,000 lbs total across all shelves, making them suitable for heavy sports gear. These units are available in widths from 24 to 72 inches and can be repositioned, disassembled, or taken to a new home at any time.
Frequently Asked Questions About Garage Sports Organization
How do you organize sports equipment on a budget under $50?
A complete starter system is achievable under $50 with the right priorities. Start with a heavy-duty S-hook pack ($8–12), which hangs on any existing shelf bracket or exposed nail. Add a boot tray ($10–15) for cleat organization and a 12-pack of adhesive Command hooks ($12–15) for helmets and bags on the wall. Use cardboard boxes lined with trash bags as temporary bins until budget allows an upgrade. The goal in the first round is to get everything off the floor and assigned a location — even an imperfect location.
How do you keep garage sports gear from smelling?
Odor in sports gear is almost always caused by bacteria thriving in damp, enclosed conditions. The solution is airflow and drying time. Never put wet gear in a closed bin. Use open hooks, ventilated wire shelves, and boot dryers. For existing odor, sprinkle baking soda inside helmets and gloves, let sit overnight, then shake out. An enzyme-based spray neutralizes odor at the biological level rather than masking it. For hockey gear specifically, many families invest in a gear deodorizer bag that absorbs moisture and neutralizes bacteria passively.
What is the best way to store hockey equipment specifically?
Hockey gear is the most demanding sports gear to store correctly because it is the bulkiest, the wettest, and the most odor-prone. The ideal hockey storage setup includes: open ventilated hooks for shoulder pads and chest pads, a boot dryer dedicated to skates, a glove stand or open hook through the glove cuff to maintain pocket shape, and a dedicated helmet hook that holds the cage open for interior drying. Everything should be stored in the Wet/Drying Zone for at least 24 hours after use before being moved to primary storage. Many hockey families add a small box fan to this zone running on a timer for 2–3 hours after game nights.
Can you organize sports equipment without drilling into walls?
Yes — a fully functional organize sports equipment system requires zero wall penetration. Freestanding wire shelving units, over-the-door organizers, heavy-duty Command hooks, freestanding PVC pipe racks, and rolling utility carts create a complete system without a single hole in the wall. The tradeoff is that no-drill systems typically have lower weight capacity per item and slightly less wall coverage than mounted systems. For light to moderate sports gear loads — one or two athletes playing non-contact sports — the no-drill approach works extremely well.
How often should you deep-clean sports gear stored in a garage?
Gear should be surface-cleaned after every use (wiping down exterior surfaces, allowing full drying) and deep-cleaned at the end of every season. A seasonal deep clean includes washing all fabric components, wiping all hard surfaces with an enzyme cleaner, inspecting for cracks or damage, and airing out all padding for 24–48 hours. The garage storage zone itself — hooks, shelves, bins — should be wiped down and reorganized twice a year, coinciding with the seasonal swap of Zone 4 (Seasonal Rotation Zone). This bi-annual audit also catches gear that’s been outgrown, damaged, or is no longer needed.
Nothing ruins a clean floor faster than loose basketballs and soccer balls rolling under your car tires. Finding the best garage ball organizer with flexible bungee cords keeps them easily accessible for kids.
Conclusion
Garage sports organization doesn’t require a complete renovation or a professional organizer. It requires a clear system, the right tools, and consistent habits.
The three biggest takeaways from this guide are these: First, always organize by zone, not by sport — zones based on frequency, user height, and moisture level create systems that actually get used. Second, airflow is non-negotiable — wet gear in closed containers destroys equipment and creates odors that are nearly impossible to eliminate. Third, labels and reset routines are what make systems permanent — without them, any garage will revert to chaos within weeks.
When you properly organize sports equipment using garage sports organization principles — the vertical zoning system, sport-specific hardware, and consistent daily habits — the garage becomes an asset instead of a liability.
Start small. Pick one wall, or even one zone. Install a pegboard panel, hang five hooks, and label everything. That one wall will change how the entire garage functions.
Good organization saves money. Families who implement even a basic garage sports organization system stop repurchasing lost equipment, stop replacing gear damaged by poor storage, and stop losing time to pre-game chaos. The system pays for itself faster than most people expect.
Start today. One wall. One zone. One habit at a time.